As an Amazon Associate I earn from qualifying purchases. This page may contain affiliate links.
The best beginner road bike pedals are usually a clipless pedal with a two-bolt cleat system, paired with cycling shoes that have a stiff sole and a recessed cleat. This guide walks you through the main pedal types, how to match them to your shoes and riding style, how to set up your cleats, and how to practice clipping in and out safely. By the end, you will know which pedal system suits you and how to install and adjust it without guesswork.
Why Pedal Choice Matters More Than Most Beginners Expect
Pedals are the only contact point between your feet and the bike aside from your hands and saddle. A pedal that fits your shoe, your riding goals and your comfort level makes every ride more efficient and more predictable. A poor match can cause foot pain, knee strain or, in the worst case, a sudden fall when you forget you are attached to the bike.
New riders often assume they need the most advanced system on the market. In reality, a simple, reliable pedal that you can clip into and out of without thinking is far more useful than a high-end option you have not yet learned to manage. If you are still deciding on a bike itself, How to Choose Your First Road Bike: A Beginner’s Guide covers the frame and sizing side of the decision.
Step 1: Understand the Three Main Pedal Types
Road riders generally choose among three categories. Each has trade-offs in efficiency, ease of use and safety.
Clipless (Clip-In) Pedals
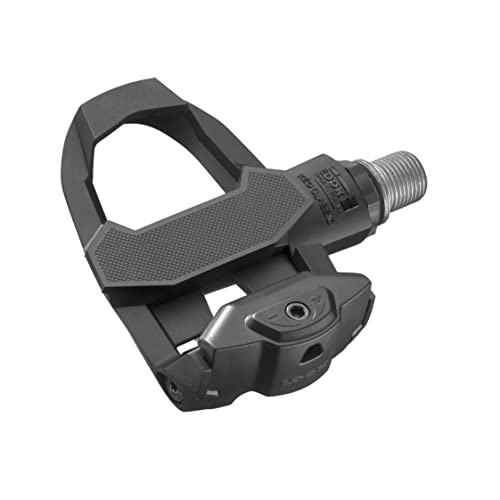
Clipless pedals use a spring-loaded mechanism that locks a cleat on the bottom of your cycling shoe to the pedal body. They offer the most efficient power transfer because you can pull up on the pedal as well as push down. Most road riders use a two-bolt cleat system, which has a small contact area and a recessed design that makes walking easier than with older three-bolt systems.
Flat Pedals With Pins
Flat pedals with metal or plastic pins grip the sole of a regular shoe. They are easy to use and let you put a foot down instantly, which can build confidence on unfamiliar roads or in traffic. The downside is that the pins can cut into your shins if you are not careful, and the grip is less secure at higher cadences.
Platform or Hybrid Pedals
Dual-sided pedals offer a flat platform on one side and a clipless mechanism on the other. They suit riders who commute, ride casually and want the option to use ordinary shoes without fully committing to clip-in shoes. Their platform side tends to be larger than a pin pedal, which helps comfort on longer rides.
Step 2: Match Your Pedals to Your Shoes
Clipless pedals require compatible cleats and shoes. Shimano SPD-SL and Look-style three-hole cleats are the standard for road riding, but many beginners choose two-bolt SPD cleats because the cleat is recessed into the sole. This makes walking off the bike far more comfortable, which matters at cafés and during stops.
When buying shoes, look for:
- A stiff or semi-stiff sole that does not flex noticeably when you press the toe
- Cleat mounting compatibility that matches your pedal system (two-bolt or three-bolt)
- A snug heel and forefoot fit with a little room for thicker socks
- Lace, Boa dial or strap closures that you can tighten quickly and loosen when your feet swell
Some riders choose a “gravel-style” shoe with a recessed cleat so they can walk comfortably. If you ride on pavement only, a traditional road shoe is still a good choice, but expect a little more awkward walking.
Step 3: Install and Position Your Cleats Correctly
Cleat position affects knee comfort, foot alignment and power output. Get it right and you will avoid a lot of early frustration.
Tools You Will Need
- A 4mm or 5mm hex key (check the cleat manufacturer’s instructions for the correct size)
- A Phillips screwdriver, if your cleats or pedals require it
- A thin layer of grease or anti-seize compound for the cleat bolts, if the manufacturer recommends it
- A marker or chalk to mark the starting position
Setting the Fore-Aft Position
Start with the cleat centered so that the ball of your foot sits roughly over the pedal spindle. Many fitters use this as a neutral baseline. Make small adjustments of 2 to 3 millimeters at a time, and ride at least 20 to 30 minutes between changes so you can judge the effect on your knees.
Setting Rotation and Float
Your feet should sit naturally on the pedal without twisting your ankles or knees. Most two-bolt cleats allow some float, which is the amount your foot can rotate before disengaging. Beginners often benefit from a generous float setting because it reduces knee strain while you learn.
Step 4: Set Release Tension Before Your First Ride
Every clipless pedal has a tension adjustment that controls how easily you can release from the cleat. Too tight and you will struggle to unclip when stopping. Too loose and you may pop out unexpectedly on bumps or during hard pedaling.
- Start with the tension set to its lowest or middle setting, as specified by the pedal manufacturer.
- Stand next to a wall or sturdy railing, clip in and practice a twisting motion with your heel outward.
- If you cannot release easily, reduce tension a notch. If you release by accident while pedaling, increase it by a notch.
- Test on a quiet street before riding in traffic.
Step 5: Practice Clipping In and Out
Practice is the single most important part of switching to clipless pedals. Use these progressions:
- Stationary practice: Sit on the bike with the rear wheel against a wall or on a trainer. Clip in and out with both feet several times.
- Slow rolling: Roll on a flat, empty area at walking speed. Clip in with one foot, pedal a few strokes, then clip out before stopping.
- Stopping practice: Approach a stop sign at slow speed. Unclip your dominant foot early, put it down, and then stop the bike. Repeat with the other foot.
- Real-world riding: Only move to traffic once you can clip out without thinking, usually after several rides.
For a broader look at handling and safety on the road, see Safe Bike Cornering Techniques for Beginner Cyclists.
Step 6: Choose the Right Pedal Body for Your Riding
Within the clipless category, pedal bodies vary in size, weight, float and durability. Road-focused options are typically lighter and have a smaller platform, while multi-use pedals have a larger, more durable body that works better for walking. Pedal weight is less important for beginners than ease of entry and release, so prioritize those features first.
If you plan to commute or occasionally walk in your cycling shoes, a dual-sided pedal with a clipless mechanism on one side and a platform on the other is a practical middle ground. Our overview of Best Commuter Bikes may help if you are considering a bike set up for city riding.
Common Mistakes Beginners Make
| Mistake | Why It Happens | Better Approach |
|---|---|---|
| Setting release tension too tight | Fear of falling out of the pedal | Start loose and add tension gradually |
| Installing cleats at the wrong angle | Rushing through installation | Mark the original position and adjust in small steps |
| Skipping stopping practice | Thinking riding is enough practice | Practice unclipping at slow speed every session |
| Buying shoes before checking cleat compatibility | Focusing on looks or price first | Confirm cleat system matches pedals |
| Ignoring knee pain | Assuming discomfort will fade | Adjust cleat position and see a professional fitter if pain persists |
Tips for a Smooth Transition
- Ride on grass or a soft surface for your first clip-in session to reduce the impact of a fall.
- Wear padded shorts and a helmet from day one, especially while learning.
- Keep your cleats clean and check them for wear every few weeks.
- Carry a small multitool so you can adjust cleats and tension on the road if needed.
- Be patient. Most riders feel comfortable clipping in after about a week or two of short, regular practice.
Recommended gear
Shimano SPD-style two-bolt pedals are a widely used platform for road and mixed-terrain riding, and they pair well with recessed-cleat shoes that make walking easier. View on Amazon
A dedicated cycling shoe with a stiff sole and two-bolt compatibility keeps power transfer efficient and makes the cleat setup simple to match. View on Amazon
A basic multitool with the hex sizes you need for cleat and pedal adjustments lets you make small corrections without a full workshop. View on Amazon
Cleat bolt grease helps prevent seizing when you remove and reinstall cleats, which keeps future adjustments easy. View on Amazon
FAQ
Are clipless pedals better than flat pedals for beginners?
Not necessarily. Clipless pedals are more efficient, but flat pedals are easier to start with and let you put a foot down instantly. Many beginners do well with dual-sided pedals that offer both options.
How long does it take to get comfortable clipping in?
Most riders feel reasonably comfortable after one to two weeks of short practice sessions, though confidence in traffic may take longer.
Do I need special shoes for clipless pedals?
Yes, clipless pedals require shoes with compatible cleats. Some riders use recessed-cleat shoes that allow easier walking.
What is the difference between two-bolt and three-bolt cleats?
Two-bolt cleats are smaller and recessed into the sole, which makes walking easier. Three-bolt road cleats offer a larger contact area and are more common on performance road shoes.
How do I know if my cleat position is right?
Your knees should track naturally over your feet with no sharp pain. Your feet should feel stable without twisting. If discomfort persists, consult a professional bike fitter.
Can I use clipless pedals for commuting?
Yes, especially dual-sided pedals or recessed-cleat shoes. They work well for commuting if you are comfortable clipping in and out in traffic.
How often should I replace cleats?
Check cleats regularly for wear. Replace them when the tread is worn down or the cleat no longer engages smoothly. Manufacturers specify wear limits in their documentation.
What should I do if I fall while clipped in?
Try to unclip your foot early when you feel the bike going over. Consult a medical professional after any fall with head impact or ongoing pain.
Conclusion
For most beginners, a two-bolt clipless pedal with recessed-cleat shoes offers the best balance of efficiency, walking comfort and safety. Set your cleat position in small steps, adjust release tension before your first ride, and practice clipping in and out at slow speed. With a few weeks of consistent practice, clip-in pedals will feel as natural as any other part of riding.